Memory & Storage
Images
Contents
A bitmap image is a picture stored as a grid of pixels. Photographs taken on a phone and drawings made in a paint program are bitmaps: underneath, the computer only stores which colour belongs in each square of the grid.
Pixels
A pixel is the smallest unit or part of an image. It is one small square of colour, and it shows exactly one colour at a time — a pixel never holds two colours, even where two different colours meet. Zoom in far enough on a bitmap and the individual squares become visible.
Colours as binary codes
A binary code records the colour of each pixel. Every colour used in the image is given its own code, and the same colour always uses the same code wherever it appears, so the computer can rebuild the picture by turning each code back into its colour.
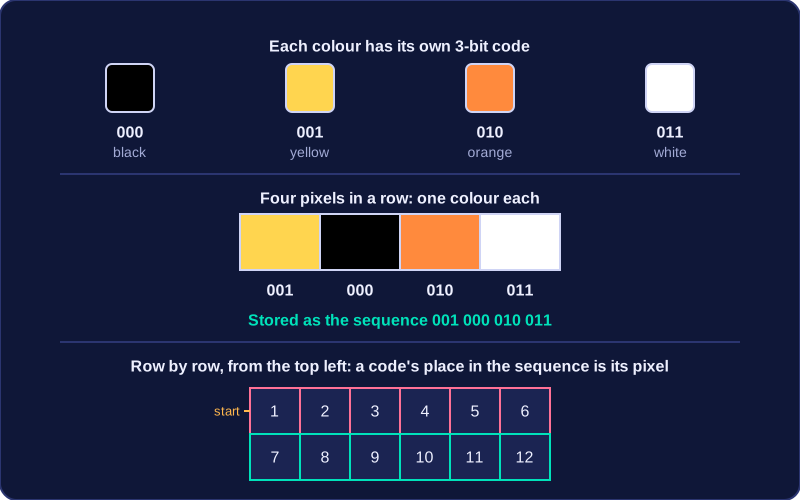
For example, a small game sprite might use three-bit codes, including 000 for black, 001 for yellow, 010 for orange and 011 for white. Four pixels in a row — yellow, black, orange, white — are stored as the sequence 001 000 010 011.
Why the order matters
The image is stored as a sequence of these codes, one per pixel, usually row by row:
- Start at the top-left pixel and store its code.
- Move right along the row, storing one code per pixel.
- At the end of the row, carry on at the left of the next row down.
- Repeat until every pixel has a code.
The codes themselves carry no position — the computer works out which pixel a code belongs to by counting its place in the sequence. A code that is fifth along in the top row must belong to the fifth pixel of that row. This is why the rows have to be stored in a consistent order: swap two codes and those two pixels change colour, but leave a code out and every pixel after it shifts along by one, scrambling the rest of the picture.
Colour depth records how many bits are set aside for the colour of one pixel, so it is measured in bits per pixel. Each pixel shows one colour at a time, and that colour is held as a binary code whose length is the colour depth.
Bits per pixel and the number of colours
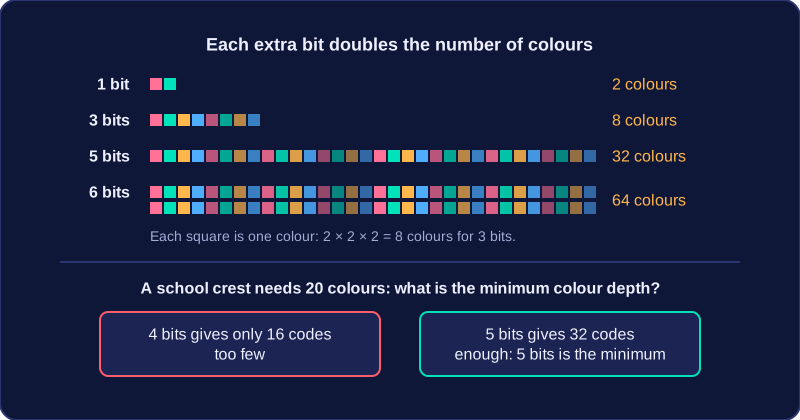
Every extra bit doubles the number of codes you can make, so a colour depth of n bits gives 2 to the power of n different colours. A depth of 1 bit gives 2 colours, 3 bits give 2 × 2 × 2 = 8 colours, and 8 bits give 256 colours.
| Colour depth (bits per pixel) | Colours available |
|---|---|
| 1 | 2 |
| 3 | 8 |
| 5 | 32 |
| 6 | 64 |
To find the minimum colour depth for a set number of colours, choose the smallest bit count whose colour total is at least that number. A school crest that needs 20 colours cannot use 4 bits, because that gives only 16 codes; 5 bits give 32, which is enough, so 5 bits per pixel is the minimum.
What changing the colour depth does
Increasing the colour depth gives more colours to choose from, so each pixel can be stored closer to its true colour. Colour accuracy and image quality improve, and colour banding — where a smooth change such as a sunset sky is stored as visible stripes of slightly different shades — becomes less likely because there are more shades in between. Decreasing the colour depth does the opposite: fewer shades are available, colours are less accurate and banding is more likely.
File size changes too. Every pixel is stored using the chosen number of bits, so a higher colour depth means more bits for every pixel and a larger file; a lower colour depth means fewer bits per pixel and a smaller file. An image of 500 pixels stored at 5 bits per pixel uses 2,500 bits, while the same image at 6 bits per pixel uses 3,000 bits. Colour depth changes the number of bits per pixel, not the number of pixels, so it does not change the image's resolution.
Resolution is the number of pixels that make up an image. It is written as the width in pixels by the height in pixels, for example 400 × 250. It is not the physical size of the picture: a poster on a wall and a small thumbnail on a phone screen can have exactly the same resolution, because resolution counts pixels rather than centimetres.
Counting the pixels
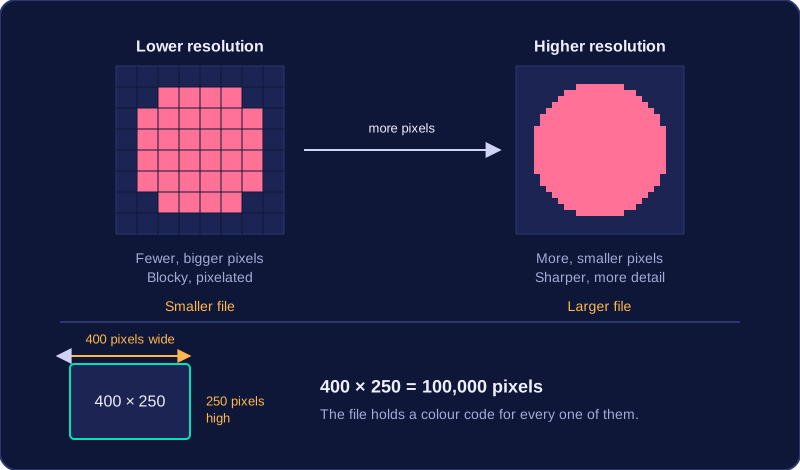
Multiply the width by the height to find the total number of pixels. An image that is 400 pixels wide and 250 pixels high is made of 400 × 250 = 100,000 pixels, so the file has to hold a colour code for every one of those 100,000 squares.
What changing the resolution does to the picture
Raising the resolution means the image is made from more, smaller pixels, so each pixel covers a smaller part of the scene. Fine features, such as the spokes of a bicycle wheel or the letters on a shop sign, each get their own pixels instead of being merged into one square. The image therefore shows more detail and looks sharper.
Lowering the resolution means fewer, bigger pixels. Anything smaller than one pixel is merged into it, and the edges of shapes become visible squares, so the picture looks blocky or pixelated. A low-resolution photo shown on a large screen looks like this too, because each of its pixels is drawn bigger.
What changing the resolution does to the file
Each pixel needs its own colour code storing, so the amount of data rises and falls with the number of pixels. An image stored at 400 × 250 must save a code for all 100,000 of its pixels, so its file is larger than the same scene stored at a lower resolution, where there are fewer pixel codes to save.
| Change | Number of pixels | Detail and sharpness | File size |
|---|---|---|---|
| Higher resolution | More | Sharper, more detail | Larger |
| Lower resolution | Fewer | Blocky, pixelated | Smaller |
Colour depth and resolution are independent properties of a bitmap image, so changing one does not automatically change the other. Colour depth is the number of bits used to store each pixel's colour, measured in bits per pixel. Resolution is the number of pixels the image is made from. You can give each pixel more bits without adding any pixels, and you can add pixels without giving each one more bits.
The four combinations
| Resolution | Colour depth | What you would notice |
|---|---|---|
| High | High | A detailed, natural-looking photo: crisp edges and smoothly blended colours. |
| High | Low | A stencil-style picture: sharp outlines, but only a few flat colours, so shading is lost. |
| Low | High | Colours blend well, but the picture looks blocky and fine detail disappears. |
| Low | Low | A simple icon: blocky and made from a handful of colours. |
For example, a stencil of a bicycle cut from two colours can be stored at very high resolution, giving clean, accurate shapes from a small palette. A tiny thumbnail of the same bicycle can use thousands of colours and still look blurry and blocky, because there are too few pixels to show the spokes.
Quality and file size
Raising the colour depth improves colour accuracy, so gradients blend smoothly and there is less colour banding. Raising the resolution improves detail, so edges and patterns look sharper. Both generally improve image quality, but neither one can do the other's job: extra bits do not add detail, and extra pixels do not add colours. A higher colour depth does not make an image look sharper, because sharpness comes from how many pixels there are.
Both also increase file size. More bits per pixel means more data for every pixel, and more pixels means more pixel codes to store. Cutting either one reduces the file size and costs some quality.
The file size of a bitmap image depends mainly on two things: how many pixels it has, and how many bits are used to store each pixel's colour. These are combined by multiplying them together to give a size in bits.
The formula
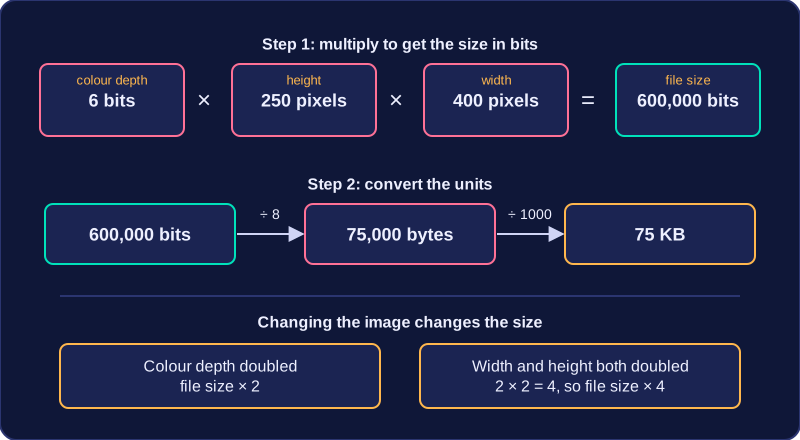
File size in bits = colour depth × image height in pixels × image width in pixels
Height × width gives the number of pixels, and colour depth is the number of bits per pixel, so the result is the total number of bits needed to store every pixel's code. For example, an image 400 pixels wide by 250 pixels high at a colour depth of 6 bits has 400 × 250 = 100,000 pixels, so its size is 6 × 250 × 400 = 600,000 bits.
Converting the units
Always do the multiplication first, then convert, because a question may ask for the answer in bits, bytes, kilobytes (KB) or megabytes (MB).
- bits ÷ 8 = bytes, because eight bits make one byte
- bytes ÷ 1000 = kilobytes
- kilobytes ÷ 1000 = megabytes
So 600,000 bits ÷ 8 = 75,000 bytes, and 75,000 ÷ 1000 = 75 KB. Write each step of the working down, so it is clear how the final value was found.
More images, larger sizes
For several images, find the size of one image and multiply by how many there are. A web page uses four banner graphics, each 120 pixels wide by 30 pixels high at a colour depth of 3 bits. Each banner uses 3 × 120 × 30 = 10,800 bits, so four banners use 4 × 10,800 = 43,200 bits, which is 43,200 ÷ 8 = 5,400 bytes.
If the colour depth is doubled, each pixel needs twice as many bits, so the overall file size also doubles. If the width and the height are both doubled, the pixel count is multiplied by 2 × 2 = 4, so the file size becomes four times as large.
Metadata is data about an image or image file. It is not the pixel colour data itself: it does not store what colour each pixel is. It stores extra information that describes the image and the file, so software and people can understand and use it correctly.
Typical metadata includes the image width and height in pixels, the colour depth, the file format, the date the image was created or changed, and sometimes a location. For example, a photo of a skatepark saved as skatepark.png might have metadata saying it is 420 pixels wide, 260 pixels high, uses a colour depth of 8 bits, is a PNG file, was saved on 12 June and was taken in Leeds. None of these values is the colour of a pixel: they all describe the image or the file.
Why some metadata is essential
The width, height and colour depth in metadata are needed to interpret the pixel data correctly. The colour depth tells the computer how many bits make up each pixel's colour code. The width tells it how many pixel codes are in each row, so it knows where each row ends and the next one begins. The height tells it how many rows there are. Without these values, the same stream of bits could be split into pixels in the wrong-sized groups or arranged into the wrong-shaped grid.
Effect on file size and quality
Metadata adds a small amount to the file size, because the extra values and text must be stored too. It does not affect image quality, because it does not change the pixel colour data. A file-size calculation may ignore metadata and count only the pixel data, or it may include a small allowance for it. Either way, metadata is not what makes an image look sharper or more detailed.
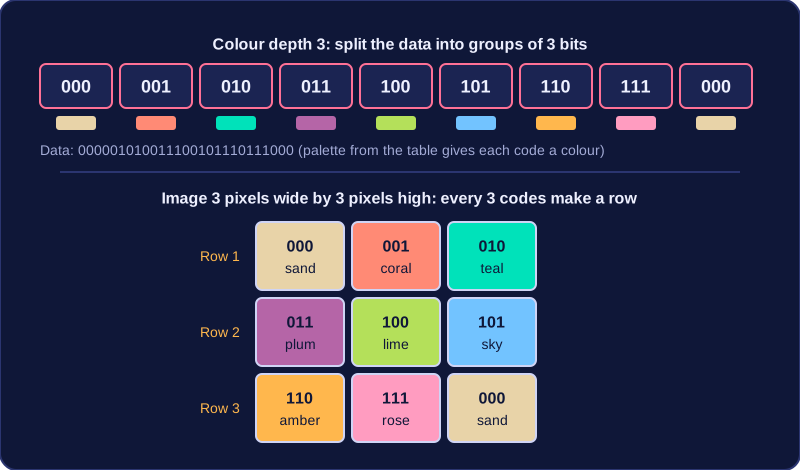
Interpreting pixel data means turning the binary stored for a bitmap image back into a grid of pixels, each showing its own colour. Each pixel's colour is stored as a binary code, and the colour depth tells you how many bits make up each code.
Split the binary into pixel codes
The colour depth is the number of bits assigned to each pixel, so it also sets the length of each group when you split the binary. For a 2-bit image, split the bit string into groups of two. For a 3-bit image, use groups of three. Every group is exactly one pixel's colour code. Splitting in the wrong place gives the wrong colours, so the groups must follow the colour depth exactly.
Match each code to a colour
Use the colour code table given with the data. Match each binary group to the colour it represents. Do not invent colours or swap a code for one you think looks better: the table is the only mapping.
For example, a palette gives 000 as sand, 001 as coral, 010 as teal, 011 as plum, 100 as lime, 101 as sky, 110 as amber and 111 as rose. The data is 000001010011100101110111000 and the image is 3 pixels wide by 3 pixels high. Splitting into 3-bit groups gives:
| Row | Codes | Colours |
|---|---|---|
| 1 | 000 001 010 | sand, coral, teal |
| 2 | 011 100 101 | plum, lime, sky |
| 3 | 110 111 000 | amber, rose, sand |
Place the pixels in order
The stored width tells you how many pixels are in each row, and the height tells you how many rows there are. Place the decoded codes in the stated pixel order, usually starting at the top-left and moving across each row. A width of 3 means the first three pixel codes form row 1; the next three form row 2; the last three form row 3. The height of 3 confirms there are three rows. Following this process turns the sequence of binary codes back into the bitmap image.